Creating a Project
3 min read
Projects are focused testing spaces inside a workspace. They help teams organize test cases, test runs, defects, requirements, releases, and project-specific collaboration in one place.
Use projects when you want to separate testing work by application, product, feature area, client, or delivery stream.
Opening the Create Project Form
Section titled “Opening the Create Project Form”To create a project:
-
Open a workspace from the Workspaces page.
-
Go to the workspace Projects page.
-
Click Create Project.
-
The Create New Project modal opens.
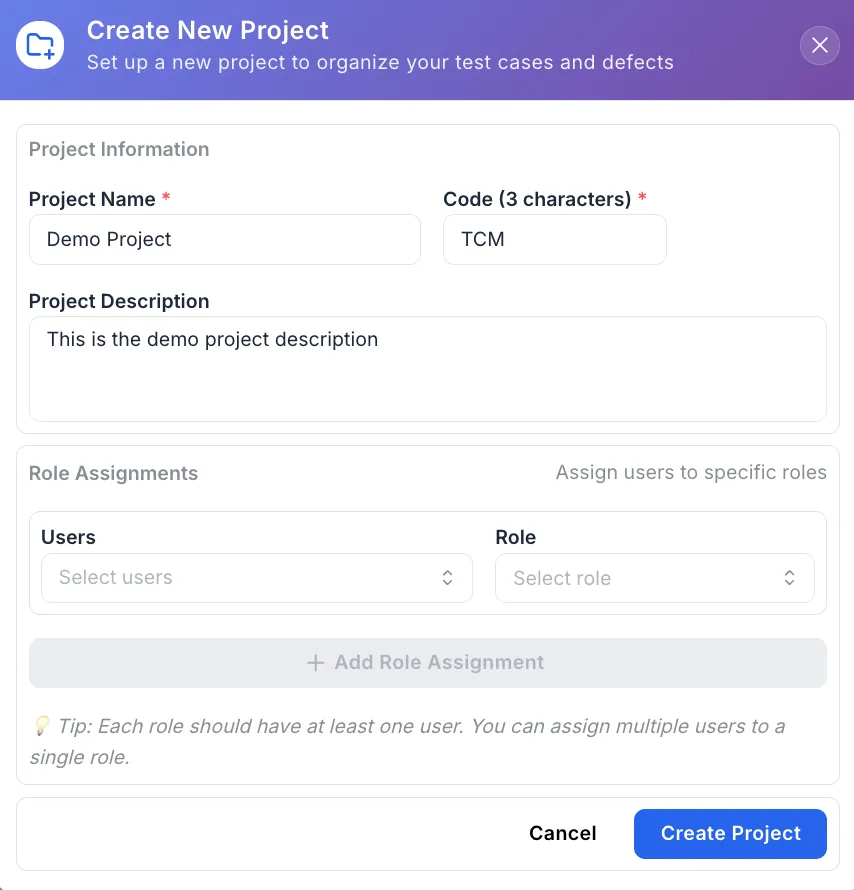
Project Information
Section titled “Project Information”The first section captures the basic project details.
Project Name
Section titled “Project Name”The project name is required.
- Must be at least 3 characters
- Should clearly describe the application, product, or area being tested
- Appears in the projects list and project navigation
Examples
Customer PortalMobile AppBilling Platform
Project Code
Section titled “Project Code”The project code is required.
- Must be exactly 3 characters
- Used as a short identifier for the project
- Should be easy for team members to recognize
Example
TCM
Use a code that stays meaningful over time, especially if your workspace contains many projects.
Project Description
Section titled “Project Description”The project description is optional.
Use it to summarize:
- What the project covers
- Which product, module, or feature area it represents
- Any useful context for testers, managers, or collaborators
A clear description helps users understand the purpose of the project before they open it.
Role Assignments
Section titled “Role Assignments”The Role Assignments section lets you add workspace users to the project and assign project-specific roles.
Each role assignment contains:
- Users – one or more workspace users
- Role – the project role assigned to those users
You can assign multiple users to the same role in one row.
Adding Users to a Role
Section titled “Adding Users to a Role”To assign users:
-
In the Users field, select one or more workspace users.
-
In the Role field, select the project role for those users.
-
Click Add Role Assignment to create another user/role group.
The Add Role Assignment button becomes available after the current row has at least one user and a selected role.
Managing Assignment Rows
Section titled “Managing Assignment Rows”When assigning users and roles:
- Users selected in one assignment are not available in other assignment rows
- Roles selected in one assignment are not available in other assignment rows
- A role assignment row can be removed when more than one row exists
- Each role should have at least one user
This helps prevent duplicate project role assignments during project creation.
Validation and Form Behavior
Section titled “Validation and Form Behavior”The Create Project button is enabled only when:
- Project Name is filled in and valid
- Project Code is filled in and valid
- Required fields have been touched
- There are no validation errors
While the project is being saved, the button shows Creating… and prevents duplicate submissions.
If you click Cancel after making changes, Hawzu protects against losing unsaved work.
Permissions
Section titled “Permissions”Project creation depends on your workspace permissions.
You need access to:
- View the project creation details
- Create projects in the selected workspace
If you do not have permission, the create project action or form may not be available.
Best Practices
Section titled “Best Practices”When creating projects:
- Use clear names that match the product or application being tested
- Choose meaningful 3-character project codes
- Add a short description for team context
- Assign roles based on each user’s responsibility
- Keep role assignments simple during creation and adjust them later if needed
- Create separate projects for distinct products, applications, or major testing areas
Next Steps
Section titled “Next Steps”After creating a project, you can:
- Learn about Project Overview
- Review the Workspace Projects Guide
- Organize test cases in the Repository
- Create and execute Test Runs
- Track Defects
- Configure Project Settings